Pages

Thursday, October 31, 2013

Sparkle N Sprinkle Winter Wonderland - November 1st Release


Welcome to Sparkle N Sprinkle's November 1 Release.

Hi everyone, hope you all are enjoying fall.  The autumn colors are just beautiful!! I am so glad you have stopped by and would like to thank all my newest followers.  It is time to reveal 2 new stamp sets from SNS!!!   It is that time of the year when are fingers are covered in ink as we start our holiday cards!!  You are going to love these stamps,  they are perfect for all your winter cards and pages!

This month we are bringing you two marvelous new stamp sets by artist Rosiland Solomon with FIVE chances to win

the first two chances are with our "Winter Wonderland" Release Contest and there are three more chances with the SNS monthly challenge where the monthly theme is always "Anything Goes with Glitter, Embossing Powder and/or Flocking."


The Winter Wonderland stamp set and the Flourishes Two stamp set are both available on line.


The Winter Wonderland stamp set, one glitter and one EP will be awarded to one commenter.
The Flourishes Two stamp set, one glitter and one EP will be awarded to another commenter.
To win, just come to our Mystery Designer Party!


How the Mystery Party works:

On two of the participating blogs below, a Commenter will be selected to receive the prize
No one knows who the Mystery Designers are, so you may wish to visit each blog to leave a comment.

The winners will be announced on November 3 on Facebook, the SNS blog, and on our blogs:


Both sets are available available at 20% off
as part of our Wintry specials.
Just use the code WINTRY20 in the COMMENTS SECTION
when checking out in the SNS on-line store
to receive these brand new sets at 20% off.
Promotion valid through November 3.(sorry, credit card customers only. Total will be manually adjusted. Or phone the SNS shoppe on Wednesday and ask them to manually adjust the charge on the phone for you).
I was just in love with this stamp set!!!  It just makes for pretty winter pages and some many ways to used glitter and embossing powder!


You can find all the instructions about my page 

HERE


I used copic markers to color all my images.  On this page I also used the Grand Madison Window die.  I just love how it makes those lovely window scenes.  On this scene Diamond Dust glitter gave the look of glittery snow.  I could not resist using that sweet snowman for last month's release Snow One Like You.  


 The glitters used on the sweet snow maiden were, Fascination glitter on the body and hat.  For the rest of the body, scarf and mitten Sparkling Snow glitter was used. 


The sparkly flowers were all cut from Tim Holtz's Tattered Flower Die.  I used sticker paper to cut them, remove the protective backing and apply Gypsy Red Microfine glitter.  I also used Sparkling Snow and Evening Glow glitter.  I punched some pine branch from a punch and glittered with Green Iris glitter.


Using Sizzix's snowflake die cut 

and the swirls from the Love Sizzlit 

I created this pretty area for the title 

to rest.  I used Reflection Microfine 

glitter and Sparkling Snow glitter.


This really made a beautiful area to rest my title!!


Quick look at the flowers on the top of the page.  The glitter ribbon was created using 1/4" Tear-ific Tape and Gypsy Red glitter.  The border was made using a border punch.

 
Hope you all have enjoyed seeing my page as much as I enjoyed designing it!!!  If you would like to get more instructions on how to make it, you can find it HERE.

Good luck to you all, and hope to see you again next month at,SNS Creative Challenge ~ Anything Goes.

Thanks for stopping by, hope you all have a very blessed day!
Belinda

SNS Products used on this page:


Birthday Wishes Challenge

Happy Birthday Christine, hope you had a wonderful day!!!

Flourishes had a sweet challenge to celebrate Christine birthday, it was to create something with a birthday theme.  I have been working on a Flying Easel Card for a very dear friend.  It was perfect for this challenge, as I had used the Butterfly and Blossoms and Botanical Bookplate stamp sets from Flourishes.


The tutorial for making this beautiful card is on Karen Burinston's Blog.  I stamped the CS with the flower from the Butterfly and Blossom stamp set with brown ink.  The butterflies were cut using Stampin Up butterfly die.  I also used Sizzix's Funky Label set.  The sentiment was stamped with Botanical Bookplate stamp set.  The pretty butterfly was hung using fishing line.  Once the card was all finished I sprayed with Tattered Angel Pearl Glimmer Mist.  That adds such a pretty vintage look.


Hope you all have a wonderful Halloween!!!  I am about to head out with the grandchildren for some fun!!

Thanks for stopping by, and remember.....Keep Stamping!!!

Belinda

Monday, October 28, 2013

Old Jalopy Spinner Card

Just wanted to share my last Halloween Card!!  


You can find all the instructions for making this card Here.  Tim Holtz 's Old Jalopy Die and Sizzix Funky Labels were used to create this card.  

Have a great evening and remember....Keep Stamping!!


Spooky Witch

Good morning, hope you all had a great weekend!!  With Halloween this week, we enjoyed several Halloween events over the weekend.  The grandchildren were so cute all dressed!


I have finally finished my Halloween cards and wanted to share one with you!    It was made using Sizzix's Accordian Album die.  This die makes for a 3D effect with your cards


I just love how this turned out!!  The sweet little witch is from SNS Candy Corn Stamp Set, this is a cute stamp set.  I stamped the image with black ink, and sponged the moon with yellow ink.  Using a glue pen I glittered her with Orange Surprise, Green Nugget, Evening Glow and Purple Potion glitter. I just love her "Sparkle"!!

The spider webs and spiders were cut from Cricut Wild Card Cartridge.  I used a brush and Brushable Glue to the spider webs and added Waterscape glitter, this added just the right touch of sparkle!  
                  
                                                                                         Cuttlebug's spider web                                                                                                                                     embossing folder was used for the                                                                                                                    embossing on this card!                                                                                               
                                                                                       
The sentiment is also from the Candy Corn stamp set.  I used Sizzix's Fancy Label die cut and glittered it with Orange Surprise glitter. Clear fishing line was used to hang the cute little spider.


 Hope you enjoyed my card as much as I did making it!!!  If you love the "SPARKLE" on my card make sure to visit  SNS online store!!

Have a Scarey and Safe Halloween!!!! Thanks for taking the time to stop by, and
remember......Keep Stamping!!
 
I will be enter this card in the Craft It Up & Link It Up Linky Party #18  Challenge.


Wednesday, October 23, 2013

Timeless Tuesday #243 - Fussy Cutting Fun!

Good morning all!!!  It is a beautiful morning here in TX.  I just love to feel that cool fall breeze.  It time for another Timeless Tuesday Challenge, and today challenge is Fussy Cutting Fun!  I thought what a funny challenge, but I fussy cut all the time.


Using the Poinsettia and Boxwood stamp set from Flourishes and the Classic Christmas set, I stamped the poinsettia onto vellum with versamark and embossed with Silver Bell Embossing Powder and the leaves with Pine Star Embossing Powder.  I just loved how this turned out, so sparkly. I embossed the CS with Cuttlebug snowflake embossing folder.  I used versamark and stamped the corners of the CS, I applied White Spark Embossing Powder and Fascination Glitter on top of the embossing powder.  Heat on the underside of the CS the embossing powder will melt and the glitter will stick to it.  It really makes for a pretty look.


Pearls were added to the middle.


Thanks for stopping by, enjoy the day and remember....Keep Stamping!!

Belinda


Tuesday, October 22, 2013

U-For Under The Tree - ABC Christmas Challenge

Here is the next letter in the ABC Christmas Challenge, it is U for under the tree!  This is a fun challenge and I am getting so many of my Christmas Cards finished (yay)!


This is a retired stamp set from Stampin Up, that I just love to use!  There is just so many ways to use these stamps either together or alone.  I colored the images with copic markers.  The pine branch were punched with MS pine branch punch.  The tips were glittered using Brushable Glue and Green Iris glitter.  The window die is the Grand Madison Window Die . I attached acetate to the back of the window and created the look of snow using Twinkling Clouds and Dimensional Glue.    Tim Holtz's wood grain embossing folder was use for the brick, I inked the folder with brown ink before it was embossed.


Santa is sure to leave something "UNDER" the tree!!


The sentiment is from Flourishes Dear Santa Set.

Thanks for stopping by, and remember....Keep Stamping
Belinda


SNS Products used on this page:


Glittery Snowman

Good morning all, hope you all are having a great start to your week!  It was a busy weekend, twins birthday party.  We had such a fun time and they were so cute.  It is a blessing being a grandparent!!


It is time to get started on all those Christmas cards, it will be here before we can turn around.  I knew I had to make a pretty glittery card with my cute little Snow One Like You set from Sparkle and Sprinkle.  This set is just adorable.  It had to be "sparkly" so I used the lacey glitter background, see the  SNS Tutorial for details on how to make. The background colors are Jasper Blue glitter and Reflection Micro fine glitter, they really make a beautiful background for my sweet little snowman.


The snowflakes were stamped with black ink and glittered using a glue pen and Reflection glitter.  For the center I  used Dimensional Glue and Jasper Blue glitter.  The sentiment was stamped with black ink on a die cut oval.  I placed 3/4" Tear-ific Tape on the oval, removed the backing and covered with Cloud Nine Micro fine glitter.  Once the glitter was rubbed onto the oval I stamped the sentiment.


I used copic markers to color the snowman. Using a glue pen, I added Reflection Micro fine glitter and Twinkling Clouds to the body of the snowman.


Have a great rest of the week, and thanks for stopping by!!!  

Remember to.....Keep Stamping!!

Belinda

SNS Products Used:


Wednesday, October 16, 2013

Candy Corn

Hi everyone! It's Belinda here and it's my first post as part of the Sparkle Team.  I would like to share my Halloween page with you, using the Candy Corn Halloween stamp set and the beautiful SNS glitter.


I used several different piece of DP from Hobby Lobby and layered them together. The Trick or Treat banner is chipboard, with rub on letters.  Using some of the DP I cut a tag and added a bow using black twine.


Cut a strip of DP at 3/4" and place a 1/2" Tear-ific Tape on the edge. Remove the protective covering, using your finger rub Orange Surprise Glitter onto tape.  The "SPARKLE" is so pretty. 


I stamped my witch image and colored with Prisma Watercolors.  Orange Surprise glitter,  Purple Potion glitter and Evening Glow glitter.  I fussy cut the image out.  Using Spellbinders Circle dies, I cut out the moon.  I sponged the circle with orange, yellow and purple pigment inks .  To give the sparkle on the edge brush brushable glue and dust with Evening Glow glitter.  Once that was dry I stamped the bats with black ink.  I attached the sparkly witch to the moon with pop dots.  The sentiment was stamped and fussy cut.  


ONE LAST LOOK AT MY PAGE


 I inked the edges of the 12 x 12 CS with black ink.

Here is a look at the 2nd page of  my layout!  I used all the same DP and glitter!  It is all ready for my little "spook's" picture from this year!!


The Happy Halloween are rub on letters!


All of the "SPARKLE" you see on my page can be found HERE.

SNS items used:

Stamp Set 470 Candy Corn Halloween

Hope you all have a wonderful day!

Belinda


Monday, October 14, 2013

The Chill Of Winter

Hope you all have had a great Columbus Day!!!  Most of the children were out of school today, here in Houston!  My twin grand babies will be celebrating their 3rd birthday tomorrow, so we went shopping today.  My little granddaughter loves to shop (yay)!  Can't believe they will be 3, how they have grown.  They were so tiny when they came home from the hospital.  Looking forward to the celebration tomorrow and their party on Saturday.

I did manage to complete a card today!!  This month's SNS Technique Video Club by Jazzy Jill showcased this card and this cute stamp set.  When I saw it I knew I had to make it!!!  It is so cute and so easy to make.


On my card I did add a frame around the globe.  Using some blue glitter cardstock and Spellbinders Fancy Circle Die Cut.  You will layer your card with your white cardstock which was embossed with the snowflake embossing folder, place your circle die cut and cut through both layers of cardstock. The clear embossable acetate is wonderful.  I stamped the snowflakes from Snow One Like You set onto the acetate with versamark ink and embossed with White Spark EP.  It really turned out pretty! 


For the inside of the card, I wanted lots of sparkle around the cute little snowman.  I took my Cuttlebug snowflake embossing folder and used brushable glue and Sparkling Snow glitter.  Take a brush and brush the glue all over your embossing folder dust with the glitter and run your cardstock through your machine.  The results are just beautiful.  Be sure to wash your folder right away so the glue with not ruin your folder!


My cute little snowman was colored using copic markers.  Draw in your snowbanks with a pen. The glitters used on the snowman were,Sparkling Snow, and Waterfall.  Stamp your sentiment and you have the cutest snow globe ever!  

I hope you all will take the time to see Jill's video, you can find it HERE!  

Thanks for stopping by, I hope you all have a wonderful week, and remember....Keep Stamping!

I will be entering this card in the: ABC Christmas Challenge - T for Transparent


Friday, October 11, 2013

Flying Easel Christmas Cards

I have been having so much fun making the Flying Easel Card, you can find a tutorial at Karen Burniston's blog.  These are super easy to make and they are just beautiful!!!  I hope you all have a chance to visit her blog and give these cards a try.

This is my 1st card


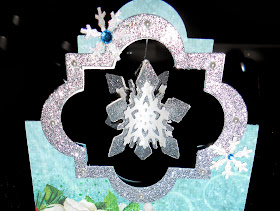
I used my Cricut Joy and Noel cartridge to cut the snowflakes.  To cut the opening Sizzix's Funky Labels Die cut were used. You will cut a second label for the frame out of silver glitter paper. I embellished the frame with pearls.  Use fishing line to attach snowflake to card.  All of the instruction on how to do this is on Karen's blog.  


Putting the snowflakes together was a little tricky but it turned out so nice. 

Here is my 2nd Card


 I just love the colors on this one with the beautiful reds!!  


If you are looking for a beautiful card for the holidays you have to make one of these!!  All the instruction are HERE.

Have a great weekend, and remember....Keep Stamping!!

Thursday, October 10, 2013

WCMD ~ Your Corner of the World

Last weekend Flourishes, had a challenge for World Card Making Day.  It was all about your little corner of the card making world.  I happen to live in Texas and knew I had to use the Cowboy Christmas stamp set for this challenge. When you think of  Texas, you think of cowboys.


I stamped the image with black ink and colored with copic markers.  Using scissors I distressed the edges of the image and sentiment and inked with brown ink.  This really gave it that rustic cowboy look, I was looking for.  I had to add that little bit of sparkle with Lator Gator and Evening Glow Glitters.


I think I capture the feel of the Lone Star State!

Thanks for stopping by and remember.....Keep Stamping!