Pages

Tuesday, December 31, 2013

Sparkle N Sprinkle's January 1 Reveal


Happy New Year and
Welcome to Sparkle N Sprinkle's January 1 Reveal.
We hope you enjoy all the new SNS products in 2014.
Among them are new, less expensive stamp sets, our own line of digital stamps, and an exclusive line of designer papers to match our glitters and embossing powders.
This month we are featuring four fun new stamp sets by artists Michelle Perkett and Beccy Muir (whose design team is also showcasing her new images) 
and EIGHT chances to win

Four chances in our "January 1 Reveal" Contest
 and
four more chances with the SNS monthly challenge where the monthly theme is always 
"Anything Goes with Glitter, Embossing Powder and/or Flocking."

The Spunky Valentine stamp set is available on line or is included in Jazzy Jill's Technique Video for the month.


Four Winners (one for each new stamp set) will be selected by Random.org during the Designers Mystery Party. Winners will also get to choose one Glitter and one Embossing Powder to go with their new stamp set.


How the Mystery Party works:

On four of the participating blogs below, a Commenter will be selected to receive the prize
No one knows who the FOUR Mystery Designers are, so you may wish to visit each blog to leave a comment.

The winners will be announced on January 3 on Facebook, the SNS blog, and on our blogs:


Each of the four stamp sets are available at 20% off 
as part of our 2014 NEW YEAR specials. 
 
Promotion valid through January 3. 
You may also phone the SNS Shoppe to place your orders.


I really think Spunky is a cute stamp set!  He really made a cute addition to my page!


I used copic markers to color him and then using Dimensional Glue on the tail, legs and hands I glittered using Night Sky.  I used Brushable Glue and Sparkling Snow on the white areas of his head and tail!  The cute little heart was glittered using Bubblegum and brushable glue.


To create the background paper I stamped with Flourishes 2 stamp set 1st with versamark and embossed with Tinsel EP, I then can back and stamped over with red ink.  I added some pearls to the swirls.


I used Flourishes 1 stamp set and White Spark EP on the red heart.  The cute little hearts were stamped with versamark and embossed with White Spark EP and fussy cut for a cute little embellishment for my sweet little picture.  I glittered the heart on my sweet grandson's shirt using a Glue Pen and Fire Engine glitter, this really adds to your picture!


The date was stamped with versamark and embossed with White Spark EP.  I punch it out using a circle punch and glued it to my dolly.


You can find all the instructions on how to create this page HERE!

I would like to share a sneak peek at a LO using Cinderella Slipper stamp set! 


Good luck to everyone!!  I hope you all have a wonderful New Year!!!  Be safe and remember....Keep Stamping

Belinda

Enter this page in the 130,000 Page View Give Away Challenge

Wednesday, December 18, 2013

Christmas Reindeer

Hi everyone, hope you all are ready for Christmas and have a wonderful time with family and friends!! I would love to share a Christmas layout of my cute little reindeers with you today.


I inked my chipboard antlers with brown ink and then embossed with Clear embossing powder.  The jingle bells were inked with versamark ink and embossed with Golden Sparkle embossing powder.  The sparkle on the bells is so pretty.  I cut Christmas from the Joys of the Season Cricut cartridge and glittered using brushable glue and Fire Engine Red glitter.
The harlequin design on the white card stock was created using Mini Harlequin template and Gesso.  While the gesso is still wet I dusted lightly with Champagne glitter.  The look is really beautiful and so sparkly!


Here is a closer look at Rudolph, he is die cut from chipboard, and inked with brown ink.  The pretty golden leaves are die cut using sticker paper, remove the backing and glitter with Champagne glitter.
A cute little red bow and fire engine red glitter for his nose!  Fire Engine Red glitter and Dimensional Glitter, were used around the photo.   There is a great video by Jazzy Jill Here for adding glitter to the photo.


Thank you for stopping by, hope you all have a wonderful Christmas!

Merry Christmas everyone.....Belinda

SNS products on this page:


Thursday, December 12, 2013

Flowers Feed The Soul

Hi everyone, it has been awhile since I have posted!!  Things have been really busy here.  I would like to share a card that I made for my daughter's mother in law for her birthday.  I used the Geraniums stamp set from SNS.  This is a really pretty stamp with many ways to use it.


To create the background paper I stamped the silhouette stamp with versamark randomly and embossed with White Spark.  It really made for a pretty background. 


I stamped the image with black ink onto watercolor paper.  I then took the silhouette stamp and colored with  copic marker RV06 on the flowers and G14 on the stems directly onto the rubber stamp.  I then spritz the stamp with alcohol and stamped on top of the first image.  This give a look of watercolors using copic markers.  The alcohol works like water on watercolors.  It really turned out pretty.  Using a glue pen I glittered the flowers with Bubblegum glitter and the centers with Daisy glitter.  I cut the image using Spellbinder's Floral Ovals.


I stamped white card stock with the small flourish from Flourish Two with pink ink.  The sentiment was stamped and punched out with an oval punch. 
 
The card turned out so pretty, and she loved it!!
 
If you like what you have seen, you can find all the supplies at SNS online  store. 
 
Thanks for stopping by, and remember....Keep Stamping
Belinda


Wednesday, December 4, 2013

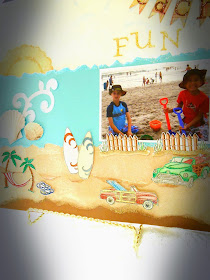
FUN BEACH DAY!!!

Good morning everyone it's Belinda with another fun layout!!  It is almost Thanksgiving, can't believe the year is almost gone!  I don't make pages by the time of the year, so this might seem a little off for this time of the year.  Here in Texas you can go to the beach anytime of the year.  However this picture was taken in Oceanside, CA during summer vacation.  We really had a great time there and spent almost everyday at the beach.  I would like to share my beach layout with you!!


You will be able to find all the instructions and products used on this layout HERE!

I made the sand by tearing 2 strips of 12 inch white cardstock.  Once I liked how it looked I inked the cardstock with versamark and embossed using Hit The Beach embossing powder.  This really made a nice look, just the right amount of sparkle!


I them stamped the cars, surf boards, palm trees, fences and flip flops from the Surfin' Woody stamp set.  All of these images were colored using copic markers, cut out and stamped with versamark and embossed using Sparkle embossing powder.  The flip flops were embossed using Dark Night.


To create the water I repeat the tearing of cardstock using blue cardstock, on the top and bottom edges I used Dimensional Glue and Waterfall glitter.


I used a 4" dolly to create the sun and tucked it under the blue cardstock. The sparkle you see is Evening Glow.


To add those soft clouds to the white cardstock, I used half of a medium scallop punch, punched twice onto cardstock to create a mask and soft pastel chalks.


To finish off the page a cute banner and letters for a really fun page!!


Looking forward to next year's fun on the beach!  I always have a wonderful time on the beach with my 2 favorite boys!!

Hope you all have a for wonderful Thanksgiving.  I know in my family we have many blessing to be thankful for!!!

Thanks for stopping by and remember.....Keep Stamping!!

Belinda


Tuesday, December 3, 2013

And The Winners Is??


Hi!  Thanks to everyone who played in Sparkle N Sprinkle's recent "Beautiful Geraniums" Mystery Party. We enjoyed making the new projects, and hope you enjoyed browsing. 


We released one new stamp set and Jazzy Jill's latest Technique Video Kit:


April Williams was our Mystery Designer for the contest. With 22 comments left on April's blog, Mr. Random.org was used to generate our Commenting Winner.


Congratulations, Jean Bullock!


Thank you for checking out the products and sample cards. 
Jean, will you please e-mail SNS_Artist@tampabay.rr.com with your mailing address, choice of one glitter and one embossing powder which can be used with your new stamp sets, and we will get your prize in the mail!


A big thank you to all for joining us in this kick off.
(and for visiting all our blogs)
hugs always from The Sparkle Team,


Saturday, November 30, 2013

Beautiful Geraniums by Sparkle N Sprinkle

Welcome to Sparkle N Sprinkle's December 1 Release.


I would like to thank you for stopping by and a special thanks to all my newest followers!!  I hope you all had a wonderful Thanksgiving!  It that time of the year when we are in shopping mode!!  So take a little break and see what we have new for you this month!

This month we are bringing you a pretty new stamp set by artist Beccy Muir with FIVE chances to win

The first chance is in our "Beautiful Geraniums" Release Contest
 and
Four more chances with the SNS monthly challenge where the monthly theme is always "Anything Goes with Glitter, Embossing Powder and/or Flocking."

The Geranium stamp set is available on line or is included in Jazzy Jill's Technique Video for the month.
 

The Geraniums stamp set, one glitter and one EP will be awarded to one commenter.
To win, just come to our Mystery Designer Party!


How the Mystery Party works:

On one of the participating blogs below, a Commenter will be selected to receive the prize
No one knows who the Mystery Designer is, so you may wish to visit each blog to leave a comment.

The winner will be announced on December 3 on Facebook, the SNS blog, and on our blogs:

Belinda Shupe (you are here)


The beautiful Geraniums set is available at 20% off 
as part of our December specials. 
Just use the code DEC20 in the COMMENTS SECTION 
when checking out in the SNS on-line store 
to receive these brand new sets at 20% off.
Promotion valid through December 3.(sorry, credit card customers only. Total will be manually adjusted. Or phone the SNS shoppe on Wednesday and ask them to manually adjust the charge on the phone for you).

Here is a look at my layout!!! 


You will be able to find all the instructions and supplies used on this page HERE!


The background paper was made using the Flourishes 2 stamp set and Golden Sparkle embossing powder.  Just stamp with versamark and emboss with this oh so Sparkly gold powder!


The images were stamped and color with copic markers.  The sparkle that you see is Sparkling Snow, Raspberry Soda, and Daisy microfine glitter. The frame around the DP was made using 1/2" Tear-ific Tape and Shimmering Sea glitter, the look is really pretty!  These sweet flowers add that special touch to my page!!  I used Tim's Holtz Birdcage Die for the little bird, inked the edges and embossed to add that sparkle with versamark and Sparkle embossing powder, the sentiments were stamped and embossing in the same manner.  All were inked with brown ink. 


This beautiful Decor Chipboard Corner adds that vintage feel to my page.  I used Magic Speckle embossing powder to create this beautiful look!! You can find a great tutorial on how to used the Magic Speckle Here.  This is one of the prettiest embossing powder, I just love the look!!


The flourish is chipboard embellishment and it was embossed with Artic embossing powder, and Magic Speckle.  I did emboss the geraniums onto a small tag with Mullberry Star embossing powder.  Perfect for journaling!


The tag was cut using Basic George Cricut cartridge.  On the shadow tag I covered it with 2 1/2" Tear-ific Tape remove the backing and cover with Shimmering Sea glitter. Just add a twine bow and you will have a pretty tag!!


Hope you have enjoyed my page, I really love how it turned out!!!  If you like what you have seen, be sure to view my SNS gallery HERE for all the details! 
 
Be sure to visit all the ladies blogs and leave a comment for a chance to win some wonderful items!!!  Good Luck to you all!
 
Hope to see you all again next month and remember....Keep Stamping!!
Belinda


Wednesday, November 27, 2013

Happy Thanksgiving Everyone!!!

Good morning everyone and a very Happy Thanksgiving!!!  All the family has arrived and the fun and cooking begins.  I know in my family we have a lot to be thankful for, 1st and foremost the Love of Jesus Christ!! 


Front of Card
 
In years past our son was away serving in the US Army, so we are thankful to have him home safe!  And thankful to be sharing this day with all the family!!
 
Our Thanksgiving Card for this year!
 
May your day be blessed with many blessings!!
 
Thanks for stopping by, enjoy your day and remember to.....Keep Stamping
Belinda

Thursday, November 21, 2013

Pop N Cut Christmas Card

Good morning everyone, hope your having a great day!!!  Today I would like to share a Pop N Cut Christmas card I just finished!!


I just love how pretty these cards turn out!!!  You can find all the instructions and tutorials about these cards on Karen Burniston's  Blog.  She has amazing ideas and wonderful tutorials, be sure to visit her blog.

 
I used the Funky Label insert from Sizzix to cut my card base.  To create the pretty wreath I used MS pine branch punch and glittered the tips using SNS Green Iris glitter.  Just arrange your branch until you get the look your looking for.  I punched small flowers and glittered with SNS Gypsy Red glitter.  You will need the Flagpole/Lantern & Sign die from Sizzix to cut the lantern.


A look at the front of the card!! 
 
Enjoy your day and thanks for stopping by!!!  Remember....Keep Stamping
 
Belinda


Wednesday, November 20, 2013

A Wintery Christmas Card

Hi there, it's Belinda here!!  Hope you all are having a wonderful day!  I have been busy working on this year's Christmas Cards and just love the Winter Wonderland set.  I thought how pretty it would be in a window card, so I went to work!


I first cut my window froma window die, and stamped and colored my image with copic markers.  You will need to cut the image to fit inside the window die.  I used Twinkling Clouds and Sparkling Snow on the window scene.


Next die cut the window box and attached it to the window.  I thought I need something to embellish the box and it came to me, the poinsettia from the Snow One Like You stamp set.  Just stamp the image 3 times and cut out.  Color with copic markers and glittered the center with Golden Silver


You will only need the poinsettia portion of the stamp!


You will adhere the window to the card front.  I used a pine branch punch for the pine.  Arrange it on the top and on each side of the window box.  Using brushable glue add Green Iris on the tips of the pine branch.


I hope you have enjoyed this card, I really love this set!!  You can find complete instructions on how to make this card HERE!
Thanks for stopping by!!  I hope your day is as "special" as you are,  see you again soon!!
Belinda


: