This is the day the LORD has made. We will rejoice and be glad in it.....PSALM 118:24

Tuesday, June 30, 2015

Sparkle N Sprinkle's July 1st Reveal

Welcome to Sparkle N Sprinkle's
 July 1 New Reveal Blog Hop!


We have FOUR new stamp sets to share with you today.  These new sets are 20% off until July 3.  So once you finish the blog hop, head on over to the store and start shopping.  All of the new sets are available on cling mounted rubber or as a digital image.  

The sets are:


3 Wisemen 720   (digi version DIGI720M)
Christmas Goose 721   (digi version DIGI721B)
Reindeer 722   (digi version DIGI722J)
Tree Scene 723   (digi version DIGI723J)


On July 3, one GRAND PRIZE WINNER will be selected from the comments left on the Designers' blogs.  Please leave a comment with each Designer in order to be eligible for the Grand Prize.  You never know who the Mystery Designer will be that has the winning comment.  

The Grand Prize Winner, which will be announced on July 3 on the SNS Facebook page and here on the SNS Blog, will receive ALL of the new stamp sets released this month (or the digi versions, if preferred).


In addition to our regular Designers, we are happy to introduce you to two new Guest Designers this month.  Ani and Chris will be our Guest Designers for the months of July, August, and September.  We'd also like to say Thank You to our first set of Guest Designers, Diane and Ashley, for a job well done!


The Blog Hop order this month is:

Marie
Ani
Belinda (that's me)
Chris
Shona
Eret
Anne

(*Tip: if you have difficulty with a particular link, try clicking on the Designer's blog title to send you to their Home page.)

Just love Christmas in July, and these stamp sets are just wonderful!!!  I played with all of them and had so much fun.  For the blog hop, Two stamp sets were used, Reindeer and Tree Scene.  I started my card by cutting a snowflake gate fold card with my Silhouette.  Here is the inside of my card.
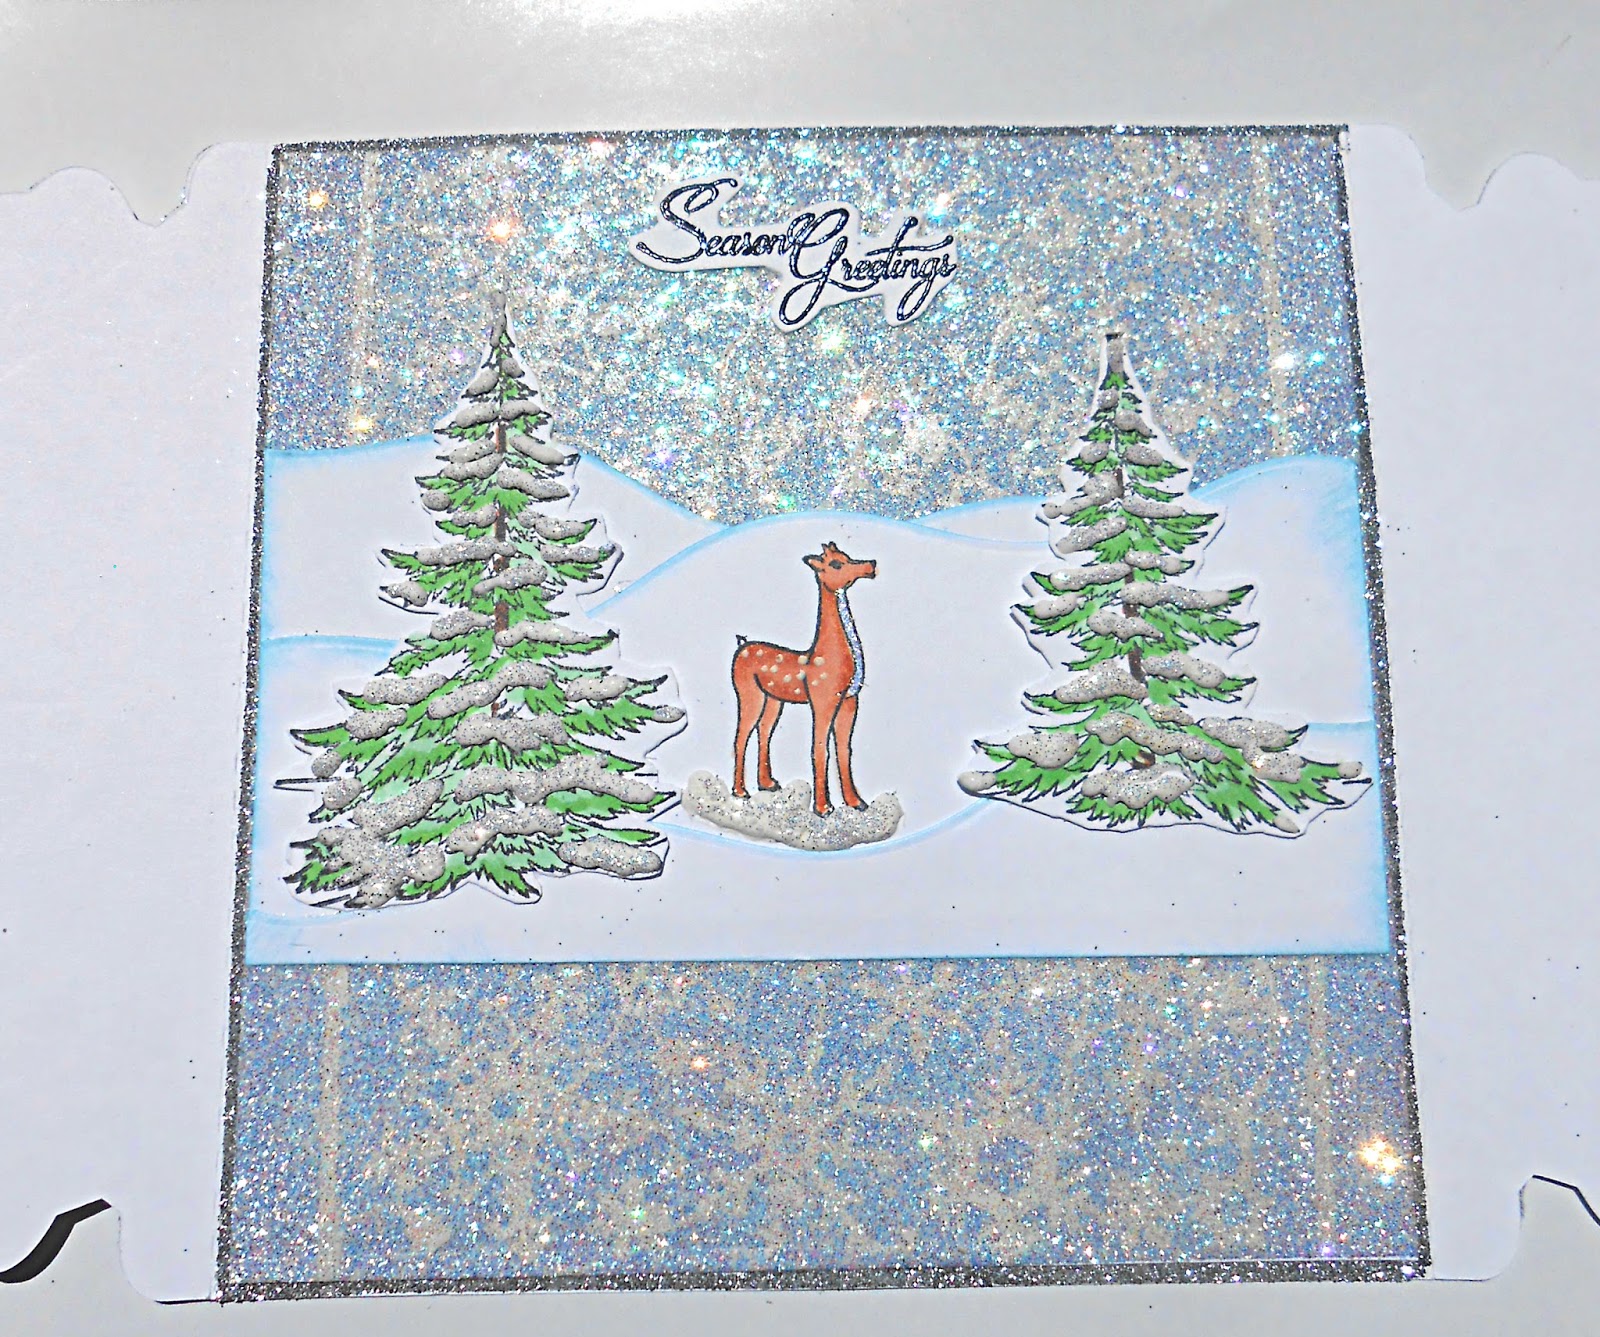


To create this winter scene, I used the Lacy Glitter Background technique. The beautiful sparkle was made using Sticker Paper, a Snowflake Metal die,  Olaf White and Waterfall glitter, a.  I hope you can see all the "Sparkle"  it turned out so pretty. Instead of using the lace, I used a metal stencil.  A strip of 1/8" Tear-ific Tape was placed along the edges and glittered using Sassy Silver.  If you have not tried the Lacy Background, you must give it a try!!  It is so beautiful and really makes your project Sparkle!!!  HERE  you can find all the details on how to make it.


Now the fun began creating this winter scene!

The snowbanks were created using Elizabeth Craft Design Outdoor Edges. The edges were inked and arranged on the background paper.


The sweet little deer was stamped with black ink colored with copic markers and fussy cut out.  I used a white gel pen and added his spots.  A small amount of sparkle was added to his chest using a glue pen and Sparkling Snow.  He was then placed on the snow bank and White Liquid Applique was added.  I wanted a little sparkle on the Liquid Applique so once it had dried and been heated with the heat gun, I used a glue pen to add stickiness and lightly dusted with Sparkling Snow.


The steps were repeated for the trees.  Just love the look of the Applique!!


The sentiment was stamped with versamark and embossed using Black Detail EP.  It was fussy cut out.

Here is a look at the card front when closed!
Just love all that beautiful Sparkle!!


The image was stamped with black ink, colored with copic markers and fussy cut out.  The chest and antlers were glittered using a glue pen and Sparkling Snow.  White Liquid Applique was added under their hoofs. They were attached to the card front only on the right half of the card.


I cut the snowflakes using sticker paper, removed the backing and glittered with Sassy Silver glitter.


A little sneak peek of project to come using all of the other stamp sets revealed this month!


We hope you enjoy the New Reveal Blog Hop as much as we have enjoyed creating new projects for it.  We also hope that we have inspired you as well.  Thanks for joining us and remember to comment on each of the Designers' blogs to be eligible for the Grand Prize.  (We love reading them too since your comments also inspire us.)  Last month the winning comment came from Eret's blog.  Who will be the Mystery Designer this month?? 


The Sparkle N Sprinkle Creative Challenge also begins today with lots of prizes and recognition badges.  Find out how you can become a SNS Featured Artist with special recognition on the SNS Facebook page as well as the Creative Challenge Winner's post.  From time to time, we also have special prizes just for Featured Artists.  The theme is always Anything Goes using Loose Glitter, Embossing Powder, and/or Flock.

Your next stop on the blog hop is Chris.  Have fun and enjoy all the beautiful projects from all the talented designers.

Good luck to all, thanks for stopping by!!


Wednesday, June 17, 2015

Give A Girl The Right Shoes

Good morning everyone, hope you are having a good start to your day!!  I would like to share my layout using the newly released Ballet stamp set.  In this layout the sentiment is the only stamp used, and it fits this layout perfectly. These sweet little feet are my precious granddaughter's!  


The cardstock was prepped using gesso.  Once the gesso was dry I placed a stencil on top of the  layout and applied  Dreamweaver Embossing paste.  Once the stencil was removed a light dusting of Sparkling Snow was applied for a bit of sparkle.  I repeated the stenciling using a different stencil with Memento Sweet Plum ink.  Dimensional Glue was applied to the inked stencil randomly and micro beads were added. Color was added to the background with small pieces of gelatos mixed with water and lightly misted around the page.  

Chipboard Dolly was inked using versamark and embossed  using Velvet Sparkle EP.  Strips of cardstock were embossed, stenciled and layered behind the photo.  A small journaling tag was cut and embossed.  The star frame was cut using my Silhouette.  It was inked with versamark and embossed with Tinsel EP.  Sparkle was added to the shoes using a glue pen and Sparkling Snow glitter.  


The Ornamental Tag One from Spellbinders was die cut and the sentiment stamped using versamark and embossed with Black Detail EP.  I took a glue pen to the swirls and flower and glittered them with Orchid glitter.  Liquid Pearl White Opal was added to the center of the flower.


The orchids were die cut using Spellbinder Die D-Lites Orchid.  Color was added to the centers using copic markers.  Lavender Iris glitter was added to the edges with a brush and Brushable Glue.


Closer look at the banners and background


Thanks so much for stopping by, have a wonderful day and remember Keep Stamping!!


Sunday, May 31, 2015

Sparkle N Sprinkle's June 1st Reveal

Welcome to Sparkle N Sprinkle's
 June 1 New Reveal Blog Hop!


We have THREE new stamp sets to share with you today.  These new sets are 20% off until June 3.  So once you finish the blog hop, head on over to the store and start shopping.  All of the new sets are available on cling mounted rubber or as a digital image.  Ballet 709 is the stamp set featured with this month's Technique Video Kit.

The sets are:


Ballet 709   (digi version DIGI709)
Hearts Like Dogs 711   (digi version DIGI711)
Life Is Better 712   (digi version DIGI712)


On June 3, one GRAND PRIZE WINNER will be selected from the comments left on the Designers' blogs.  Please leave a comment with each Designer in order to be eligible for the Grand Prize.  You never know who the Mystery Designer will be that has the winning comment.  

The winner will receive all of the new stamp sets released this month (or the digi version, if preferred).

The Grand Prize Winner will be announced on June 3 on the SNS Facebook page, the Designer's blogs, and here on the SNS Blog.  

In addition to our regular Designers, two of our 2015 Guest Designers, Diane and Ashley, are with us again this month.

The Blog Hop order this month is:

Anne
Ashley
Marie
Belinda
Shona
Eret
Diane
 (*Tip: if you have difficulty with a particular link, try clicking on the Designer's blog title to send you to their Home page.)


Hope you are enjoying all the new releases and beautiful project by our wonderful Design Team.  When I saw those pretty ballet shoes, I knew I had to have that set.  My daughter started taking dance when she was 4 (she's know 37)!  


To start my layout I used Martha Stewart scalloped punch and punched around the page.  I did not want a perfect punch, instead I wanted a mess punch.  The edges were inked with brown ink. I prepped my page with gesso before starting my page and let it dry.   Using a pink gelato randomly on the page for some soft color.   Next I laid my floral stencil on top and covered with embossing paste.  Removed the stencil and covered with Sparkling Snow glitter. A second stencil was placed down and stenciled using blue ink with a sponge dauber.


My photo was layered with dollies, tag, and different DP.  


For those pretty slippers, I stamped them with black ink and colored with copic markers.  Brushable Glue was placed on the slippers and Petal Soft flocking was applied.  For the ribbons Bubblegum glitter was added using a glue pen.  They were then fussy cut out and placed on the page with pop dots.


Here you can see a closer look at the background.  The orchid was die cut using a Spellbinders die.  A small amount of colors was added to the flower using copic markers.  Using brushable glue and a small paint brush Sparkling Snow glitter was added to the edges of the orchid. The letters are from Tim Holtz. 


The sentiment was stamped with black ink.  Small rhinestones were randomly placed on the page, as well as dots White Opal Liquid Pearls. 


The butterfly is a stamp from My Rose Garden.  The background paper was created using gelatos and water.  Once the paper had dried I stamp the butterfly and fussy cut out.  Sparkling Snow glitter was added to the edge of the wings.

Hope you have enjoyed my layout, I really had fun putting it together.  Here is a little sneak peek of a layout to come using only the sentiment of the Ballet Stamp Set.  I hope you will come back by to see the entire layout!!


We love reading your comments and hope that we have inspired you as well.  If you can not leave a comment for some reason, please email icinganne@yahoo.com with your comment and the name of the blog or the Designer you are commenting about.


The Sparkle N Sprinkle Creative Challenge also begins today.  There are lots of prizes and recognition badges.  Come check out how you can become a SNS Featured Artist as well.  The theme is always Anything Goes using Loose Glitter, Embossing Powder, and/or Flock.

We hope you enjoy the New Reveal Blog Hop as much as we do.  Thanks for joining us and remember to comment on each of the Designers' blogs to be eligible for the Grand Prize.  
Last month I was the Mystery Designer with the winning comment.  Wonder who it will be this month????
 
The next stop on our blog hop is Shona!!!

Wednesday, May 20, 2015

Birthday Wishes

 
Good morning all, I wanted to share a gate fold shutter card with you.  This is such a fun card to make and the results are so pretty!  Since we have been having fun with stencils, stamps and embossing paste this month, I decided to create my background with stencils.  I used the Three Hibiscus stencil from Dreamweaver with gelatos and Velvet EP.  To create the belly band cut a strip of cardstock about 1" to 1 1/2" wide. Place a strip of 1/4"  Tear-ific Tape on the strip remove the backing and applied Starfire glitter.  You will fold the band around the card and secure the ends with double sided tape.


Using strips of white cardstock and gelatos, I applied these 4 colors onto the cardstock.  Mist the strips lightly with water and blend the colors together.  You could use any colors, that's the fun of making your own background papers.


Next you will lay the stencil on top of the strips and start wiping the color away using a baby wipe.  You can wipe a lot of your color away, or slightly wipe the color away. 


Once you have created the look you want on your background, remove the stencil and stamp the entire strip using versamark.  You will then apply Velvet EP and heat emboss, for a beautiful sparkly background for your card!


Layer your strips and adhere to the 2 front panels.


I used the Fan Geisha stamp set, stamped with black ink and colored with copic markers.  The image was fussy cut.  The entire image was inked with versamark and embossed using Velvet EP.  


To create the inside of the card and were the magic happens, use the tutorial Here for all the details.
The sentiment is from My Rose Garden stamp set.


I used one of the flowers from the stencils laid it on top of a piece of cardstock that had a piece of 2 1/2" of Tear-ific Tape with the backing removed.  Make sure to cover the back of your stencil with Coconut Soap for easy removal.  Carefully applied glitter to the stencil, the glitter used here is Evening Glow,Shell Pink and Green Nugget


This is a look at the card with the center slightly closed.  

Have a wonderful day and remember..... Keep Stamping!!


Tuesday, May 19, 2015

Happy Mother's Day

 
Had to share the last of my Mother's Day cards for this year!  Hope you all had a wonderful day, I sure did!!  This card was made for my beautiful daughter.


I just love easel cards and this one turned out so pretty!!
 
Thanks so much for stopping by and remember.....Keep Stamping!!

Monday, May 18, 2015

Good Morning All!


Good morning everyone, hope your weekend was wonderful!!!  I have been working on a couple of cards using the same stamp set from Sparkle N Sprinkle and would like to share the 1st one with you this morning.


I used the Fan Geshia stamp set.  This is such a beautiful set!!  To start my card I stamped the bamboo stamp with versamark onto my background paper and embossed with Cappuccino Star EP.  This was my first time to use this powder and it is just beautiful!


The image was stamped with black ink and colored using copic markers.  To added the sparkle, I used a glue pen and Spirited Green, Waterfall and Champagne glitters.  The edges were ink with blue ink.

For the border piece, it was punched using Martha Stewart scalloped punch.  A piece of 1/4" Tear-ific Tape was placed and glitter using Laser Blue glitter.


Enjoy the rest of your day and remember.....Keep Stamping!!

Thanks so much for stopping by!

Friday, May 15, 2015

Happy Birthday Card


Good afternoon everyone!!!  I'm looking forward to the weekend and spending time with my grandchildren!!  Today I would like to share a birthday card that I made for my daughter.


To create this easel card I used Spellbinder's Majestic Labels Twenty-Five dies.  


The sparkly butterfly was created using Dreamweaver's Butterfly stencil, sticker paper and Sparkle N Sprinkle's Soft and Sparkle flocking.  Using a glue pen I added Purple Rain glitter around the edges of the oval.


The Hyrangea was cut using Spellbinder's Hydrangea Die D-Lites dies.


For the sparkle under the bottom of the card I removed the backing from a piece of sticker paper and placed it on the back of the cardstock and glittered using Sparkle N Sprinkle's Purple Dust glitter.


Have a wonderful weekend and remember....Keep Stamping!!