This is the day the LORD has made. We will rejoice and be glad in it.....PSALM 118:24
Showing posts with label SNS Embossing Powders. Show all posts

Tuesday, November 7, 2017

Nature's Elegance

Good morning all, this morning I would like to share a card I made using a lot of embossing powders and the new Lovely as Leaf stamp set from Sparkle N Sprinkle.  Let me show you have this came together.


So if you are thinking wait that is not the colors of the embossing powders listed you are right!  I did make serveral different backgrounds using this technique, the colors may be different but the technique is the same. 


Rub the back of the stencil with Coconut Soap and place it on top of the sticky side of the sticker paper.  The soap will help the stencil come off of the paper more easily.  Next I sprinkled the Raspberry Tart embossing powder turned upside down and removed the excess.  Next Tangy Tangerine was added turned upside down to remove excess.  Lastly the Daffodil was added and excess removed.  The stencil was then removed from the sticker paper.


The remaining sticky areas were covered using Magic Speckle embossing powder.  The excess was removed and the entire piece was heat set. 


Here you can see how pretty the embossing powders blended together to create a beautiful look. 


A small butterfly was punched using a Stampin Up Butterfly punch, glittered using the Small Nuvo Glue Pen and Daffodil glitter.
 
 
 The sentiment was stamped using the Lovely as a Leaf stamp set.  The panel was then layered onto the card base and a ribbon was added.
 
I really love how pretty these embossing powders blended together.  If you haven't used embossing powders with your stencil you must give it a try.  This background can be made with any color of embossing powders you like!
 
Thanks so much for stopping by have a great day and remember......Keep Stamping!!


Wednesday, June 14, 2017

Sparkle N Sprinkle's June New Reveal


Welcome to the Sparkle N Sprinkle
 June Reveal Blog Hop!


We are now revealing our new stamp sets on the15th of each month.  On the first of the month, a new video kit club will be revealed.

We are continuing to add new product lines, so be on the look out for them.  The newest addition is Hampton Arts.


We have four new rubber stamp sets plus one huge digi bundle being revealed this month.  

The sets are:


(Digital Version DIGI851BG - additional sentiment)
  (Digital Version DIGI854LS - additional sentiments)
(Digital Version DIGI856FS - see below)
(Digital Version DIGI857SG - additional sentiments)

DIGI856FS - Swallowtail Butterflies (includes lots of additional colored images, additional sentiments, and digi paper)


When you purchase the digi versions of any of the SNS rubber sets, you are getting lots of extras that aren't available otherwise.  These extras include additional images and/or sentiments not available with the rubber version, digi papers (in some cases), and a cut file to use with your electronic cutting machines will also be included with all digi images purchased!

You're definitely going to want both the rubber versions as well as the digi versions of all our new releases.

The new sets are 20% off until June 20, 2017.  So once you finish the blog hop, head on over to the New Store and start shopping.

On June 18th, ONE GRAND PRIZE WINNER will be selected from the comments left on the Designers' blogs listed below. Please leave a comment with each Designer in order to be eligible for the Grand Prize.  You never know who the Mystery Designer will be that has the winning comment.

The Grand Prize Winner, which will be announced on the SNS Facebook page and the SNS Blog, will receive ALL of the new rubber stamp sets revealed this month.


The Blog Hop Order this month is:
Belinda  (your here)

(*Tip: if you have difficulty with a particular link, try clicking on the Designer's blog title to send you to their Home page.)


We hope you enjoy the New Reveal Blog Hop as much as we do.  Thanks for joining us and remember to comment on each of the Designers' blogs to be eligible for the Grand Prize.  

 Wonder who the Mystery Host will be this month????


Have you checked out the SNS YouTube Channel featuring Demo Donna?  If not, then you are in for a real treat.  Subscribe today to get all the latest Demo Donna tips and techniques!


We are also happy to announce the new and improved SNS Creative Challenge.  It will now be held on Facebook. 

 Search for the Sparkle N Sprinkle Creative Challenge group and ask to join today.  This is a closed group, but we want anyone who wants to participate to join (just trying to keep out spammers 😀).  You can join today!

 The new challenge will begin July 1 and will run from the 1st - 25th of each month.  A SNS image (either rubber or digi) needs to be used.  If you don't have any yet, no worries, there are some Freebies located on the new website.  They are located on the Home page, just scroll down a bit to see them:

The Winner and Top Three will be posted on the last day of each month.  The Winner will receive a $15 Gift Certificate to the new on-line store.  Please review all the Challenge Rules before submitting your photo.

We hope to see you soon in our new Facebook Group!

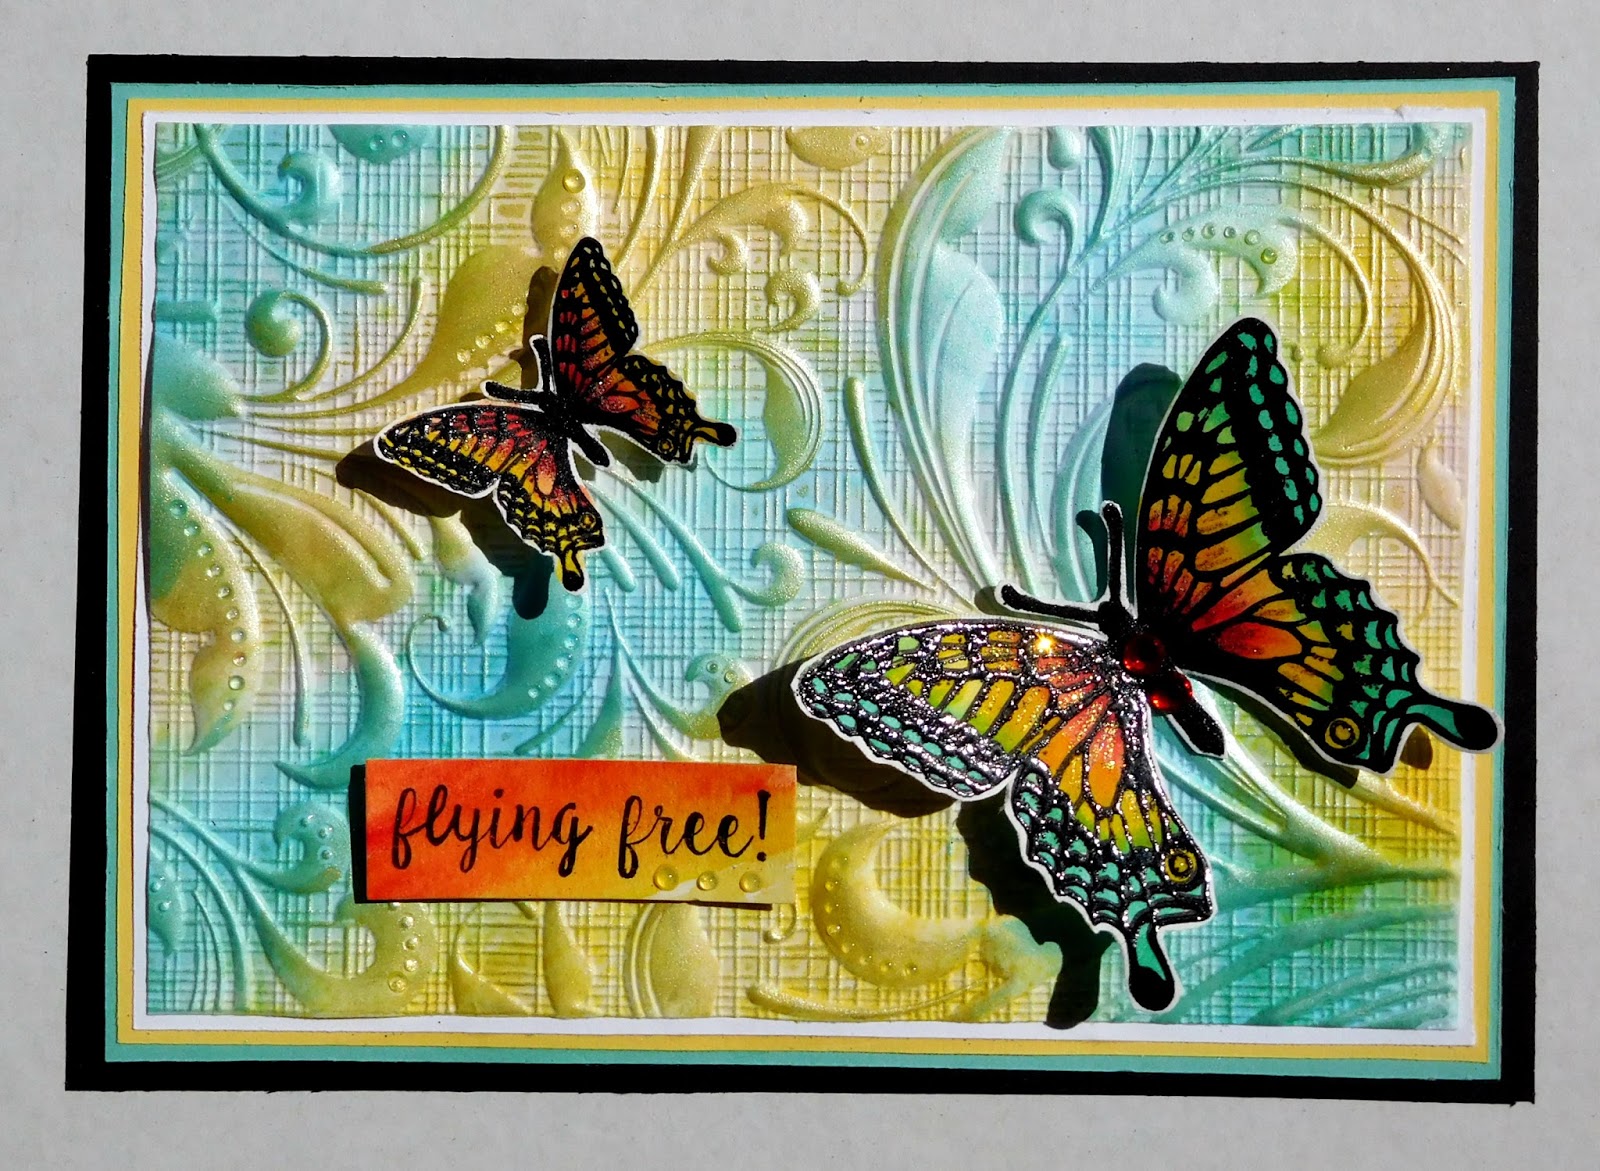
Hope you all are having fun on the blog hop!!  I just love all of the stamp sets this month, but my favorite was the beautiful Swallowtail Butterflies.  Let me show you how my card came together.


The background paper was created using distress ink and a blending tool.  The cardstock was covered with Mustard Seed and Peacock Feathers ink blending well.  


Once all the white areas were covered I laid a piece of slightly wet paper towel on top to blend the inks together.  


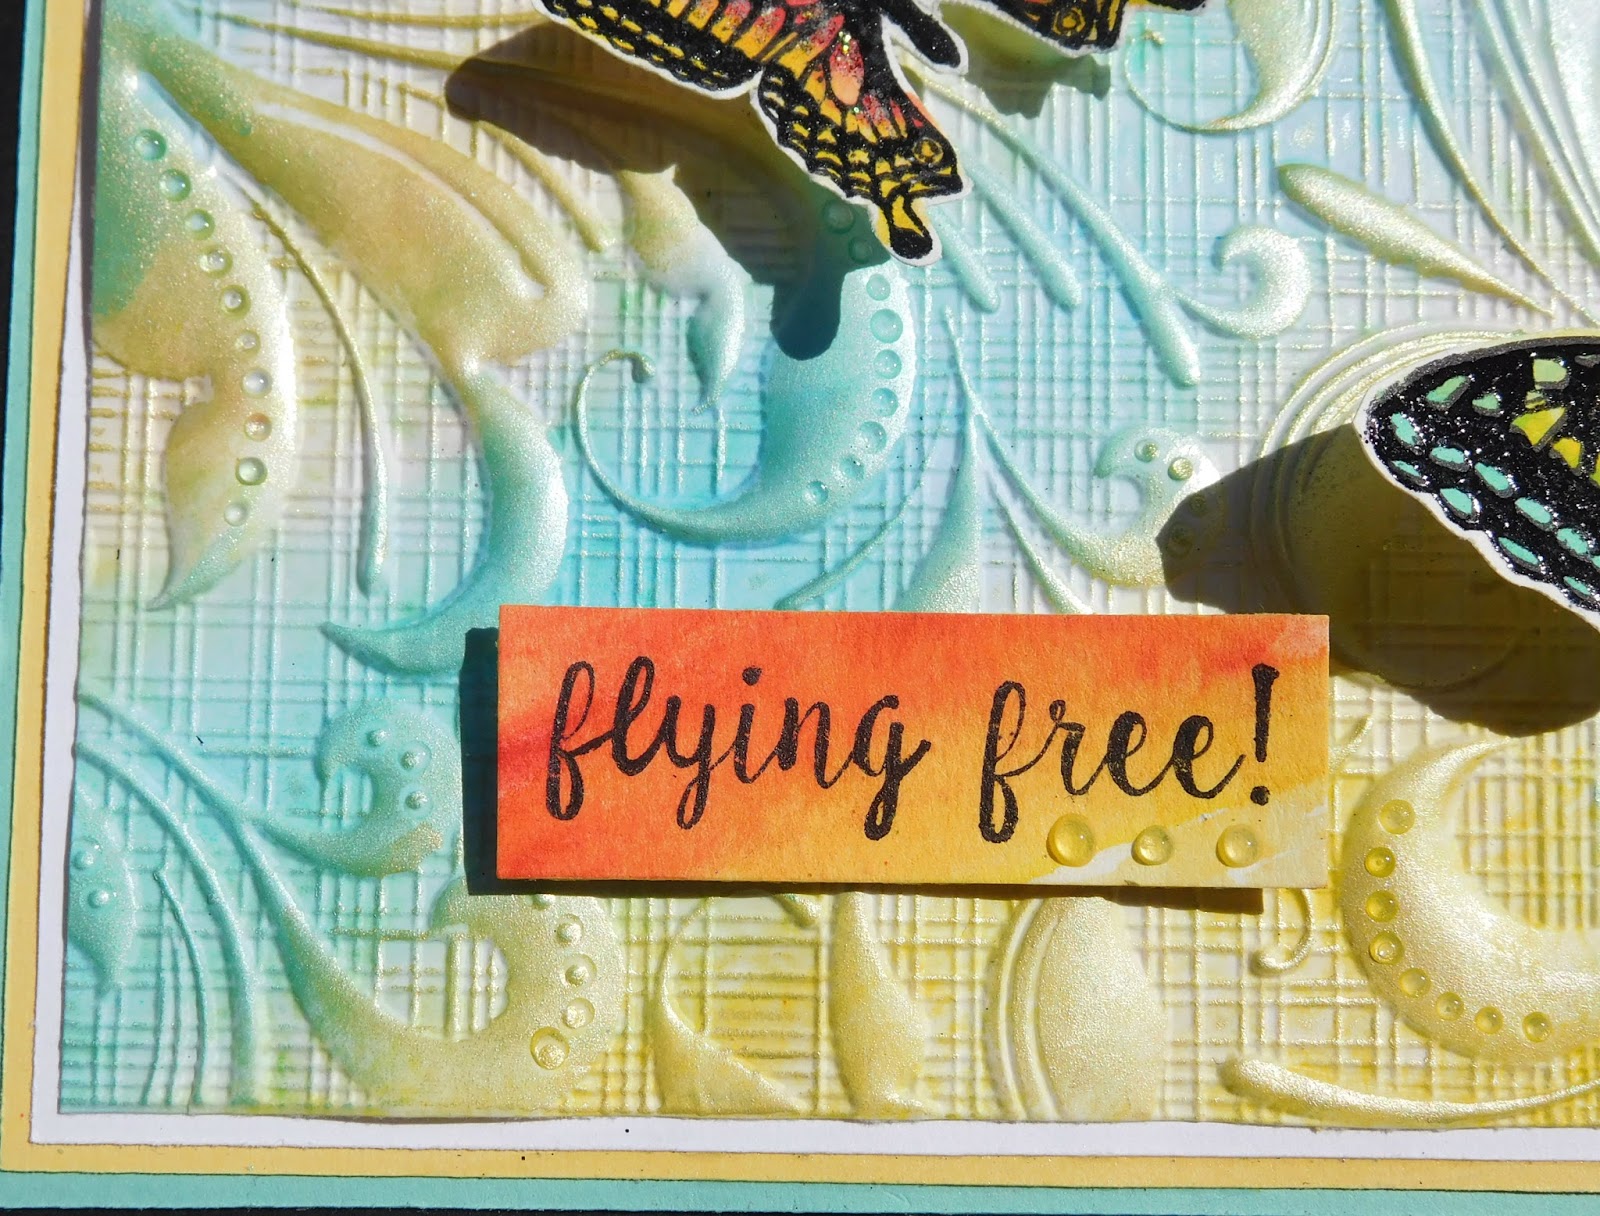
The wet paper towel lighten the ink and created a beautiful background for my butterflies.  I really wanted a bit of shimmer so after the cardstock was dry, I embossed it with the new Crafter's Companion 3d Embossing Folders.  They are so beautiful!!  The next step was to embellish the embossing using Lemon Sorbet and Aquamarine Mousse from Nuvo.  I did this using my finger and the result was so pretty.  Small drops of Sea Breeze Jewel Drops were placed on the small dot in the embossing.  


Next it was time to start on the butterflies.  I stamped the butterflies onto watercolor paper.  This was done using the Misti and StazOn ink.  Leaving the paper in the Misti the butterflies were colored with Nuvo's Red Apple, Lemon Zest and Aqua Splash Aqua Markers.  Once the ink was dry the butterflies were re stamped with versamark and embossed using Clear EP.  


The same technique was used on the smaller butterfly using only the Red Apple and Lemon Zest markers.  Both butterflies were fussy cut out and placed on the card using foam dots.


For the sentiment I blended the Red Apple and Lemon Zest on a piece of watercolor paper.  Once dry the sentiment was stamped with Memento Tuxedo Black ink and small drops of Limoncello Jewel Drops were added.  


I would like to leave you with a sneak peek of my other projects to come, hope you will come back by to see the reveal!!

Have fun on the hop and enjoy all the beautiful projects!!

Next stop on your blog hop is the wonderful and very talented Eret!!!

Wednesday, April 20, 2016

Caged Bird


Good morning everyone, hope you are having a wonderful day!  I would like to share a project with you using SNS products and Want 2 Scrap chipboard.

Caged Bird

To start my card I created my background using embossing pasteUltramarine Blue Color Burst, a  Prima stencil and Sparkling Snow glitter.

prep

I placed a small amount of embossing paste onto my craft mat and tapped a small amount of powder into the paste and mixed well.  The stencil was placed on top of a piece of watercolor paper and the embossing paste was applied on top.  The stencil was removed and I had a beautiful background layer.

Caged Bird

While the paste was still wet I lightly dusted the entire piece with Sparkling Snow glitter for a pretty sparkle.
The bird cage was die cut using Tim Holtz's Caged Bird die and embossed using Vintage EP.  This step was repeated twice.

Caged Bird

The small bird was covered with versamark and embossed with Skylight EP.  I decided that I need a bit more color on the bird so I re inked the tail with versamark and embossed with Flashy Flamingo EP, which gave it a pretty sparkle.

Caged Bird

I re inked the bottom of the bird's belly and embossed using Daffodil EP.

Caged Bird

To add the spots I placed a few piece of the Super Thick White EP and heated from underneath.

Caged Bird

The small Hydrangea was die cut using Spellbinder's die.  The flowers were inked on the edges and a small dot of Green Apple Crystal Drops were placed in the middle.  Two larger dots were placed on the bird cage using Green Apple and Bubblegum Blush Crystal Drops.

Caged Bird

Small leaves were added to the top of the cage using Sizzix Branches and Leaves die.
Thanks so much for stopping by, have a great day and remember....Keep Stamping!


Friday, September 18, 2015

Have A Nice Day

Good morning all, today I would like to share a beach shadow box card with you that was made using the Tropical stamp set.

Have A Nice Day

The background for the card was created using Ultramarine Blue and Pthalo Green Color Burst.  I misted the paper and then added the powders and let them mix together to created this pretty background.  The frame and inter frame was cut using my Silhouette.  1/2 Tear-ific Tape was placed on top of the outer frame.  I removed the backing and applied Ocean glittered around the frame in small areas.  The step was repeated using Spirited Green glitter to create a pretty frame.  The 2 frames were then adhere together and placed on top of the background paper using foam tape.

SNS Tropical #158

Using dimensional glue I placed large dots on a piece of plastic and covered with Sparkling Snow to create the bubbles.  The glue dots were left to dry overnight and then removed from the plastic piece and placed on the card.  Small piece of chipboard was placed inside the frame.

Tropical #158 SNS

The sea shells were all stamped with versamark and embossed using Glitzy Gold EP.  The shells were fussy cut out and colored using copic markers.  Small drops of Glossy Accents were placed on the shells and allowed to dry.  The shells were then placed on the card using pop dots, pearls and twine was added.    The seaweed was cut using the Silhouette inked with green ink and glittered using brushable glue and Spirited Green glitter.

right

The wave and seahorse were cut using the Silhouette.  For the wave the bottom portion was inked with blue ink and glittered using brushable glue and Ocean glitter, the top of the wave with Sparkling Snow glittered.  The seahorse was inked with versamark and embossed with Abracadabra EP.  A small pearl was added for the eye.  Small dots of Glossy Accents were added along the edges of the frame.

Tropical #158 SNS

The sentiment was stamped and cut apart.
Thanks so much for stopping by, have a wonderful day and remember....Keep Stamping!

Thursday, August 13, 2015

Cancer Awareness


Good afternoon everyone, hope you have had a great day!!  I'm sharing today my last card made for SNS August Reveal.  It was created using Die-Versions Awareness Butterfly die and SNS Pink Ribbon Background stamp set.


The butterfly was die cut using sticker paper.  I removed the protective backing and glittered using Ocean glitter.  


The background paper was created by stamping the background stamp with versamark and embossed using White EP.  The background paper was then misted and Alizarin Crimson, Violet and Ultramarine Blue Color Burst was applied.  I misted alittle more and let the colors come to life.  


Thanks so much for stopping by, have a wonderful evening and remember....Keep Stamping!!

Wednesday, August 5, 2015

Walk For A Cure

 Good morning everyone, today I am sharing a Latch Card for Cancer Awareness.  I choose the color purple for this ribbon, it represents Cancer Survivors.

card

To create the background I used the Pink Ribbon Background Stamp.  I stamped the image with versamark and embossed with White EP.  Then using Color Burst Violet and Ultramarine Blue along with water the background came to life.  I really love how pretty this turned out.  For a little added sparkle the heart were glittered using a glue pen and Purple Dust glitter.

butterfly

The Awareness Butterfly ribbon is from Die-Version.  It was die cut from sticker paper and glittered using Purple Rain glitter.  I traced around the outside of the ribbon onto sticker paper and cut out.  Removed the backing and placed the purple ribbon on top.  The open areas were then glittered using Sparkling Snow glitter.

background


The sentiment was stamped with versamark and embossed using Venus Violet EP.

flower


The flower embellishment is a image from the Sunflower Stamp Set.  It was stamped with black ink and colored with copic markers.
Along the edge a piece of 1/8 Tear-ific Tape was added and glittered using Purple Dust glitter.

DSCN7858

I finished off the inside of the card using the small sunflower from the Sunflower Stamp Set and the sentiment from the Iris Frame Stamp Set.  Three small pearls were added using Opal Liquid Pearls.
Have a wonderful day and remember...Keep Stamping!!


Wednesday, April 22, 2015

Get Well Wishes


Good afternoon everyone, hope your is day is going great!!!  I would like to share my last card using the newly released Old Well stamp set from Sparkle N Sprinkle.  For this card I only used the sweet little bunnies and sentiment.  


To create the brick wall I embossed white cardstock with Tim Holtz's brick wall embossing folder.  Using pastel chalks I colored the wall and torn along one edge.  The wall was adhere to the front panel of my card and distressed around the edges.  The sentiment was stamped using versamark and embossed with Raspberry Tart EP.  Using 1/4" Tear-ific Tape and Green Nugget glitter a glittery edge was create for the card base.


This sweet butterfly is from Sparkle N Sprinkle's Brocade Background stamp set.  It was stamped using pastel inks and glittered using a glue pen, Spirited Green and Evening Glow glitter.  


I stamped those cute little bunnies with black ink and colored using copic markers.  I used Elizabeth Craft's Design Outdoors Edges die for the grass and Memory Box Fence Die for the little fence.  A small strip of Mon Ami Gabby diamond mesh was added to the middle of the grass and finished off with a sweet dragonfly brad.

Thanks so much for stopping by and remember....Keep Stamping!!

Tuesday, November 25, 2014

It's Almost Thanksgiving!

Good morning everyone, it's almost Thanksgiving, and I'm thankful for so much this year!!

My Thanksgiving cards have all been made and mailed, so I thought I would share them with you.


I used SNS Crackle Background stamp and embossing folders on the leaves.  Some leaves were embossed using Gold, Autumn Medley, Pine Green EP.  The sentiment is SNS Pilgrim Thanksgiving stamp set.


For the pretty sparkle on this card I used SNS Orange Surprise and Sparkling Snow.
The front panel was embossed using Tim Holtz's woodgrain embossing folder.  For the turkey breast I created the paper using my gelli plate.


The front panel paper was created using leaves from outside and a gelli plate.  The sparkle is Sparkling Snow and Spirited Green glitter from SNS.

And finally a project my daughter and I did for her secret sister at church.  This cute acorn holds small treats and is just so cute.  This was cut using my Cameo, inked and put together.  


I embossed the leaves with the Houndtooth embossing folder.  For the top of the acorn I stamped it with SNS Crackle Background stamp with white ink.  Tied a ribbon and filled it with a few treats!

Wishing you all a very blessed Thanksgiving!

Thanks so much for stopping by and remember.....Keep Stamping!!

Wednesday, November 5, 2014

Let It Snow!

Good Morning everyone, I would like to share a winter layout with you!  The Pine Forest stamp and Snow One Like You stamp set were used on this layout. 


 The pine trees were stamped with versamark and embossed using Christmas Green Marbled EP and fussy cut out.


I cut the snowflake overlay using the Cameo Silhouette.  The snow banks were die cut and  the edges were inked with blue ink.  The banks were then inked with versamark and embossed using Velvet Sparkle EP.


The deer was die cut using Tim Holtz's Reindeer Flight from chipboard and inked with dust rust ink.  Pine branches were punched and place on the deer along with a pearl and bow.


The sentiment from Snow One Like You was stamped and punched with a circle punch.  The Let It Snow embellishment were cut using my Cameo Silhouette.  The flourish was die cut and glittered using Silver Dreams glitter.


Along the edges of the LO,  I placed 1/8" and 1/4" Tear-ific Tape.  1/8" Tape was glittered with Blue Lightning, and the 1/4" with Silver Dreams.  The snowflake was also cut using Cameo Silhouette.

If you would like more details on this layout please visit my Gallery.

Have a wonderful day!!!